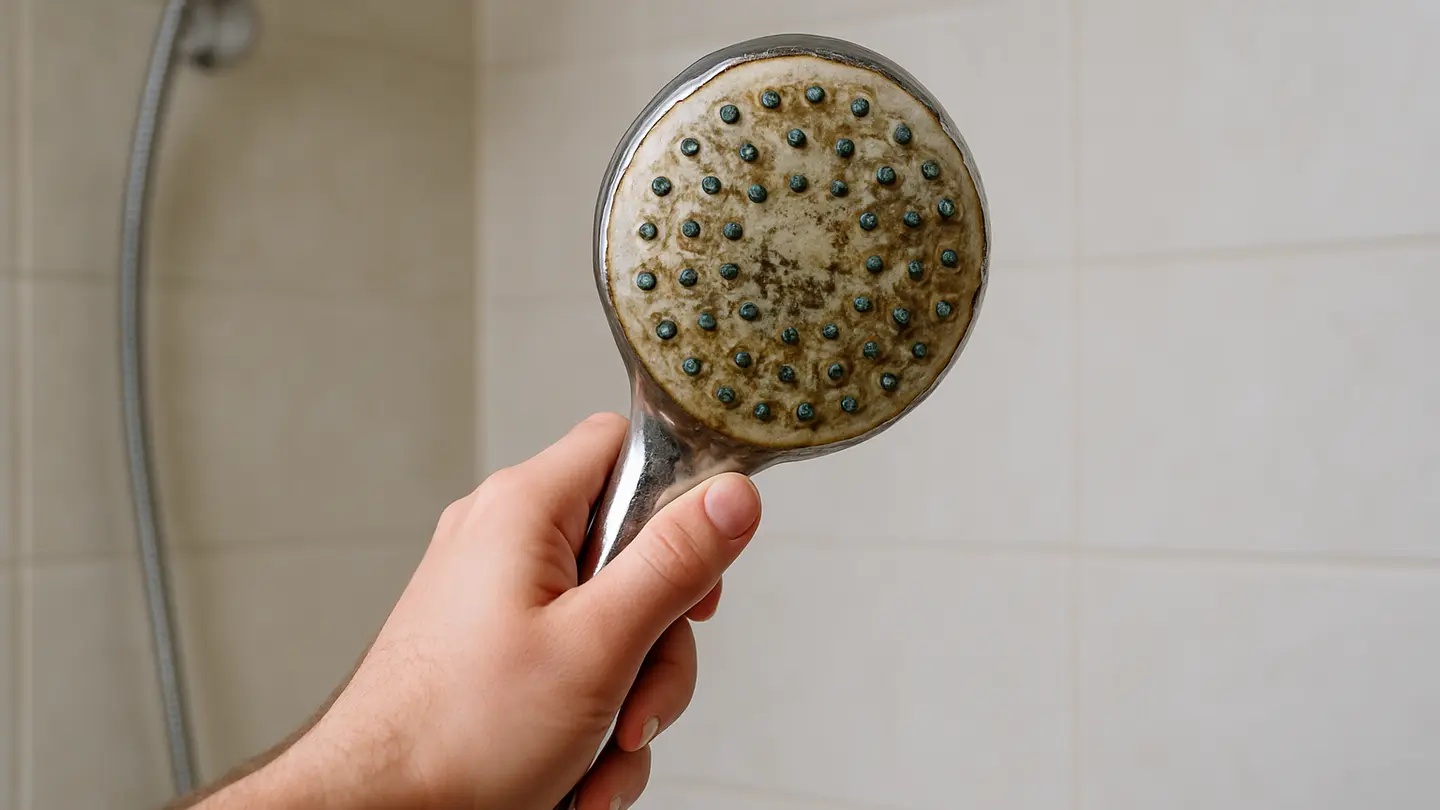
If you are asking, “why is my shower head moldy,” the short answer is usually moisture, warmth, residue, and time. Shower heads sit in one of the wettest parts of a building, often in a bathroom that stays humid long after the water is turned off. Water, soap residue, minerals, and organic matter can collect around the spray face, nozzles, joints, and internal passages.
The result may appear as black or greenish spots, a slippery film, pink-orange staining, or a musty smell. In many cases, the issue is manageable with routine cleaning and better ventilation. Recurring growth, however, can point to broader moisture problems, a poorly maintained fixture, or water-quality conditions that accelerate buildup.
Common Reasons Mold Forms on Shower Heads
Mold and mildew thrive where moisture remains on surfaces. A shower head is especially vulnerable because it is repeatedly exposed to warm water and then left to dry in a humid room. Even when the outside looks clean, water can remain trapped inside nozzle openings, spray plates, threaded joints, ball joints, and narrow crevices.
Several factors commonly work together:
- Warm, humid air: Bathrooms often stay damp after use, especially when doors are closed and ventilation is weak.
- Low light: Shaded corners and enclosed shower areas often dry more slowly.
- Standing water in nozzles: Droplets can remain in silicone nozzles, spray holes, and internal channels.
- Soap and shampoo residue: Body wash, conditioner, and other products can leave films on fixtures.
- Body oils and organic residue: Small amounts of organic matter can collect on the shower head.
- Hard-water minerals: Calcium, magnesium, and limescale deposits create rough surfaces where residue can adhere.
- Poor ventilation: Without an exhaust fan or open window, humid air lingers.
Hard water does not directly “create” mold, but mineral scale makes the fixture harder to clean. A scaled spray face has more texture, more crevices, and more opportunity for recurring growth.
In commercial settings such as hotels, gyms, apartments, and healthcare-adjacent facilities, usage patterns also matter. High-frequency showers may remain wet for much of the day, while low-frequency showers may allow stagnant water to sit inside the fixture. Both conditions can contribute to buildup if maintenance schedules are weak.
What the Different Colors of Bathroom Growth May Mean
Visible growth on a shower head is not always the same thing. Without laboratory testing, it is not responsible to identify a specific mold species from color alone. Still, color and texture can help indicate what type of buildup may be present.
Black or dark green spots often draw the most concern. Dark growth may appear where surfaces have stayed wet for prolonged periods, especially around nozzle openings, gasket lines, threaded joints, and the underside of the spray face. It may be mold, mildew, or a mixture of microbial growth and mineral-stained residue.
Pink, red, or pinkish-orange film is common around shower heads, grout lines, drains, and soap dishes. It is often associated with moisture-loving bacteria rather than mold, but the response is similar: clean the surface, remove residue, and reduce how long the area stays wet.
Green growth can appear where moisture, minerals, and residue combine. In some cases, greenish staining may relate to metal corrosion or water chemistry, particularly on older fixtures or plumbing systems. If the color persists after cleaning or appears on multiple fixtures, water quality may be worth investigating.
White, chalky, or crusted buildup is usually mineral scale rather than mold. However, limescale can shelter residue and make the surface more hospitable to future microbial growth.
If growth wipes away but returns quickly, the bathroom environment is likely staying too wet, the shower head is retaining residue internally, or there is an underlying moisture problem nearby.
Can a Moldy Shower Head Affect Health?
A small amount of visible growth on a shower head may not seriously affect most healthy people. Many bathrooms develop some mildew or biofilm over time, and routine cleaning generally keeps it under control.
That said, visible growth should not be ignored. Shower heads aerosolize water into fine droplets. If a fixture is poorly maintained, those droplets may carry small amounts of loosened residue, spores, or bacteria from the spray face or internal passages.
People who may be more sensitive include:
- Individuals with asthma
- People with mold allergies
- Users with chronic respiratory conditions
- Young children or elderly occupants
- People with weakened immune systems
- Occupants who notice coughing, wheezing, congestion, or irritation after showering
The risk depends on the amount of growth, the wider bathroom condition, the user’s sensitivity, and whether there are broader moisture or ventilation problems. A single dirty shower head is different from widespread mold on walls, ceilings, caulk, and cabinetry.
Even when the apparent health risk is low, cleaning visible growth is sensible. It improves hygiene, helps restore spray performance, reduces odors, and prevents buildup from becoming harder to remove later.
How to Check Whether Mold Is Inside the Shower Head
Start with a close visual inspection. Look at the faceplate, nozzle tips, seam lines, swivel joint, hose connection, and the threaded area where the shower head attaches to the arm. Warning signs include black, green, brown, or pinkish-orange spots; slimy film; and crusted mineral buildup around spray holes.
Next, notice the smell. A musty, earthy, or stale odor near the shower area may suggest that mold or mildew is present on the fixture or nearby surfaces. Odor alone does not prove the shower head is the source, but it is a useful clue.
If the shower head can be removed, inspect the inside. Many handheld and fixed models can be unscrewed from the hose or shower arm. Once removed, check for:
- Dark residue near the inlet screen
- Mineral scale inside the connector
- Debris trapped behind washers or filters
- Discolored buildup around internal plastic parts
- Slime or film on surfaces that are normally hidden
Some shower heads include flow restrictors, mesh screens, rubber washers, or multi-spray selector parts. These components can trap minerals and residue. If they are removable according to the fixture design, clean them carefully and reinstall them in the correct order. If the fixture is sealed or complicated, avoid forcing it apart because damaged parts can cause leaks or poor spray performance.
How to Clean Mold from a Shower Head in Six Steps
For many shower heads, household cleaning is enough to remove visible buildup and improve clogged nozzles. White vinegar is commonly used because it helps loosen mineral deposits and residue. However, not every finish tolerates acidic cleaners equally. Matte black, oil-rubbed bronze, unlacquered brass, decorative coatings, and some plated finishes may require extra caution. When in doubt, check the fixture care instructions and test a small area first.
Do not mix vinegar with bleach or other harsh chemicals. Mixing cleaning products can create dangerous fumes or damage finishes. Use one cleaning method at a time, rinse thoroughly, and work in a ventilated area.
Step 1: Prepare the Cleaning Supplies
Gather the supplies before removing anything from the shower. A typical cleaning setup includes:
- White vinegar
- Warm water
- Baking soda, if a mild paste is needed
- An old toothbrush or small soft brush
- A soft cloth or microfiber towel
- A bucket, bowl, or plastic bag for soaking
- Rubber bands or ties for the plastic-bag method
- Pliers or an adjustable wrench for tight fittings
- A cloth to wrap around the fixture before using tools
The cloth is important. Metal tools can scratch chrome, brushed nickel, matte finishes, and decorative coatings.
Step 2: Take Off the Shower Head If Possible
Removing the shower head allows a more thorough cleaning because the fixture can be submerged and inspected from both sides. Many shower heads unscrew by hand: hold the shower arm steady and turn the shower head counterclockwise.
If the connection is tight, use pliers or a wrench carefully. Wrap the fitting with a soft cloth first. Avoid excessive force, especially on older plumbing, plastic connectors, or wall-mounted arms that may already be stressed.
If the shower head will not come off easily, do not keep forcing it. A fixed shower head can still be cleaned using the plastic-bag soaking method.
Step 3: Soak the Fixture to Loosen Buildup
For a removed shower head, fill a bucket or bowl with white vinegar and warm water. A common approach is roughly equal parts vinegar and water. Submerge the spray face and connection area, then let mineral scale and residue soften.
For light buildup, 30 minutes may be enough. For heavier limescale, a longer soak may help. Avoid leaving sensitive finishes in acidic solution for extended periods unless the care instructions allow it.
For a fixed shower head, fill a sturdy plastic bag with the vinegar-water solution. Lift the bag around the shower head so the spray face is submerged, then secure it with rubber bands or ties. Make sure the bag is supported and not pulling heavily on the shower arm.
If the shower is above natural stone, delicate tile, or other acid-sensitive surfaces, protect the area from drips. Vinegar can etch or dull some materials.
Step 4: Scrub Nozzles and Crevices Gently
After soaking, use an old toothbrush or soft brush to scrub the spray face, nozzles, seams, and crevices. Focus on areas where dark spots, mineral scale, and residue collect.
Flexible silicone nozzles can often be rubbed gently with fingers or a cloth to dislodge scale. For stubborn clogs, a toothpick or straightened paperclip may help clear individual spray holes. Use a light touch. Forcing a sharp object into the nozzle can damage silicone tips or push debris deeper.
If needed, make a mild paste with baking soda and water for surface grime. Apply it gently, scrub lightly, and rinse well. Avoid abrasive pads or harsh scouring powders on plated or coated finishes.
Step 5: Rinse Thoroughly and Reattach
Rinse the shower head with warm water to remove loosened residue, vinegar, and any cleaning paste. Pay attention to internal openings, inlet screens, and nozzle holes. If you removed washers or screens, rinse them separately and reinstall them correctly.
Reattach the shower head by threading it back onto the shower arm or hose connection. Hand-tightening is often enough. If a tool is needed, use minimal pressure and protect the finish with a cloth. Check that the washer is seated properly to avoid leaks.
Step 6: Flush the Shower Head with Hot Water
After the fixture is reassembled, run hot water through the shower head for several minutes. This flushes out remaining vinegar, loosened mineral particles, and internal debris. It also helps confirm whether clogged nozzles have improved.
Watch the spray pattern. If several nozzles are still blocked, repeat a shorter soak and gentle scrub. If the fixture continues to clog quickly after cleaning, the issue may be heavy water scale, an internal component that cannot be cleaned effectively, or an aging shower head that is ready for replacement.
How to Reduce the Chance of Mold Coming Back
Prevention is mostly about reducing moisture time and residue buildup. A shower head does not need to be sterile, but it should be allowed to dry and should not accumulate layers of scale and soap film.
The most important step is ventilation. Use an exhaust fan during showers and leave it running afterward long enough to remove humid air. If there is no fan, opening a window or leaving the bathroom door open can help. In multi-unit housing, hotels, gyms, and care facilities, ventilation performance should be part of routine maintenance.
Other useful prevention measures include:
- Dry the shower area: Wipe down walls, glass, and fixtures when practical.
- Clean the shower head regularly: A monthly wipe-down and periodic soak can prevent stubborn buildup.
- Control mineral scale: In hard-water areas, descaling may need to be more frequent.
- Avoid heavy residue: Rinse shampoo, conditioner, and soap from the fixture and nearby surfaces.
- Check seals and joints: Leaks or slow drips keep surfaces wet and can encourage recurring growth.
- Replace deteriorated parts: Cracked nozzles, worn washers, and damaged finishes can trap residue.
Product design also matters. Shower heads with accessible spray faces, easy-clean nozzles, removable inlet screens, and smooth finishes are generally easier to maintain. For buyers specifying fixtures for hotels, apartments, student housing, or wellness facilities, cleanability should be considered alongside flow rate, finish, cost, and style.
Mold-resistant materials and newer designs may help reduce recurring issues, but no material eliminates the need for cleaning. The bathroom environment still determines whether moisture and residue remain long enough to support growth.
When a Mold Problem Needs Professional Help
A moldy shower head is often a localized maintenance issue. Widespread mold is different. If growth appears across ceilings, walls, grout, cabinets, insulation, or areas outside the shower enclosure, professional assessment may be needed.
Professional help is also appropriate when mold returns quickly after proper cleaning. Recurring growth can suggest:
- A hidden plumbing leak
- Moisture intrusion behind walls or ceilings
- Poor exhaust fan performance
- Condensation from inadequate insulation
- Persistent high indoor humidity
- Damaged grout, caulk, or waterproofing
A plumber may be the right contact if there are leaks, pressure problems, dripping fixtures, or water supply concerns. A mold remediation specialist may be appropriate if growth is widespread, materials are damaged, or the source is not obvious. In commercial or rental properties, documentation and prompt corrective action are especially important.
If occupants experience persistent symptoms that seem connected to a bathroom or shower area, such as worsening asthma, coughing, congestion, eye irritation, or musty odors that do not resolve after cleaning, it is reasonable to seek professional evaluation. The goal is to remove visible growth and identify why the environment is allowing it to return.
Another Way to Build a China Supplier Shortlist
For B2B buyers evaluating shower heads, bathroom fixtures, replacement parts, or maintenance-related products, supplier screening is often separate from product specification. Made-in-China.com is a B2B sourcing platform that can support early-stage supplier discovery; it is not a shower manufacturer or factory.
One practical starting point is Supplier Discovery, which provides ways to find and narrow potential suppliers, including Audited Suppliers and regional supplier channels. Audited Suppliers are subject to third-party verification and on-site audit, with Audit Reports available for review. These reports can cover general supplier details, export trade, manufacturing capacity, quality control, and R&D capability.
Easy Sourcing can also reduce manual outreach during quotation. Buyers can submit a sourcing request, receive quotations from matched suppliers, compare quotes, and request samples. As with any sourcing channel, these tools should support—not replace—buyer due diligence, sample evaluation, specification review, and commercial negotiation.
Related and Recent Articles
For further reading, buyers and facility teams may want to review related topics such as shower head material selection, finish durability, hard-water performance, flow-rate requirements, replacement cycles, and maintenance planning for high-use bathrooms.
Recent editorial coverage may also include guides on comparing shower head manufacturers, evaluating OEM and ODM suppliers, understanding plating and corrosion risks, and building a practical quality checklist before placing bulk orders.